Week #2 - Interaction
LMS Evaluation Introduction

Welcome to the 2nd week of evaluations between the capabilities of Desire2Learn and Blackboard. This week five tools were examined within each system. These tools included:
- Creating an electronic gradebook
- Creating groups
- Creating group discussion topics
- Creating synchronous web conference
- Quality check as a demo student
D2L LMS Evaluation
Tool #1 Creating an Electronic Gradebook
In D2L, you can set up an electronic gradebook. D2L allows the creation of gradebook categories that can help to organize related items into blocks or sections. You can arrange the category “Week #1” and organize the grades for that week. For example, as seen in the screen shot below you can include the Wk 1 Quiz, Wk 1 Post, and Wk 1 Assign in the category “Week 1”. You can use other options for categories, for example, grouping all quizzes together, all projects together, and so forth. The navigation was very easy once you understand the difference between an item and a category. You click on Manage Grades, select Category from the New button. You give the category a name (e.g., Week 1) and click save and close. To establish a new item, you click Manage Grades, select item from the New button. You must first select the type of grade item, it can be a numeric, pass/fail, text, or a formula. Next, you need to give a name to the new item (e.g., Wk1 Quiz) and select a category to associate with this item. This is an important step but simply attaching an item to a category can be overlooked - but you can edit it later if you miss this step initially. Once you have completed this you can assign the points to the item. You click save and close and the item is created. Below you will find the screen shots for creating the new category, the new item, and what it looks like when completed. In summary, the overall findings of the setting up an electronic gradebook:
- Strength: You can set up categories and items to help organize the grades better
- Weakness: Easy to overlook associating the correct item with the correct category

|

|

Tool #2 Creating Groups
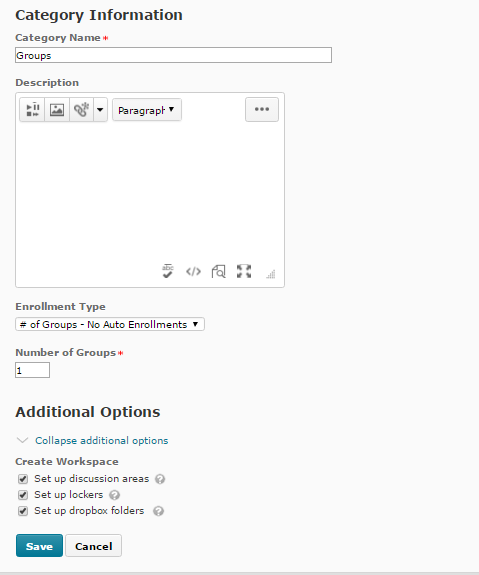
When creating groups in D2L, you go into the communication tab and click on groups. One nice feature in D2L is that you can arrange groups under different categories so if you choose to use different groups for projects, assignments, and discussions this is possible. This is helpful so a student could be a member of different groups at different points in your course. Next, you would click on the new category folder button. You would then need to enter a name. You then need to determine the enrollment type you want to use from the list. It is great to have the different enrollment options but it can be confusing at first to decipher between the options. They include:
- # of Groups – No Auto Enrollments: This option creates a specified number of groups (e.g., 5 groups). Users can be added through the enrollment option. Best to use when you know how many groups you want to have and who you want in each group.
- Groups of # Selecting: This option creates the smallest number of groups needed to place users in groups of a specific size. For example, if you want to have teams of 4 and you have 30 students, 8 teams would be created (7 teams of 4, 1 team of 2). You can have students automatically enrolled into groups or not. Best to use this option when you want a particular size for each group.
- # of Groups Selecting: This option creates a certain number of groups that the instructor designates. You can use automatic enrollment or not. Best to use this option when you know how many groups you need. .
- Groups of # – Self Enrollment: This option creates the smallest number of groups needed to place all users in groups of a certain size. Students can choose their own group. Best to use this option when you know how many big you want the groups and you want students to choose their own groups.
- # of Groups – Self Enrollment: This option creates a certain number of groups and allows students to pick their own group. Best to use this option when you want to allow students to pick their own groups but within the number of teams you have set.
- # of Groups of # – Self Enrollment: This option creates a certain number of groups with a certain number of members. Students can pick their own groups. Best to use when you want a certain number in a group, you want members to pick their own team, and you want a maximum number in each group.
- Strength: The category feature allows for student to be members of different groups.
- Weakness: Understanding the enrollment options

Tool #3 Creating Group Discussion Topics
In D2L when creating groups, you have the option to set up a discussion area for each group. This was mentioned in the previous section. In this restricted discussion area, you will need to create a new forum by clicking on this link, give it a name, and click save. Once this is completed you will see a link within the category for group. You can click on this link and create your topic. Once you have a topic created, you can post your thread. You do have to go into the forum or the particular topic and restrict the access to the group. This is not automatically done with you create this through the group. You could also click into the Communication tab and access this discussion as well. Below is a video to guide you through this process. In summary, the overall findings of the creating group discussion topics:
- Strength: D2L does allow for restricted areas and topics for groups
- Weakness: You need to understand the difference between a forum and a topic. You also need to set the restriction to the specific groups.
Tool #4 Creating a Synchronous Web Conference
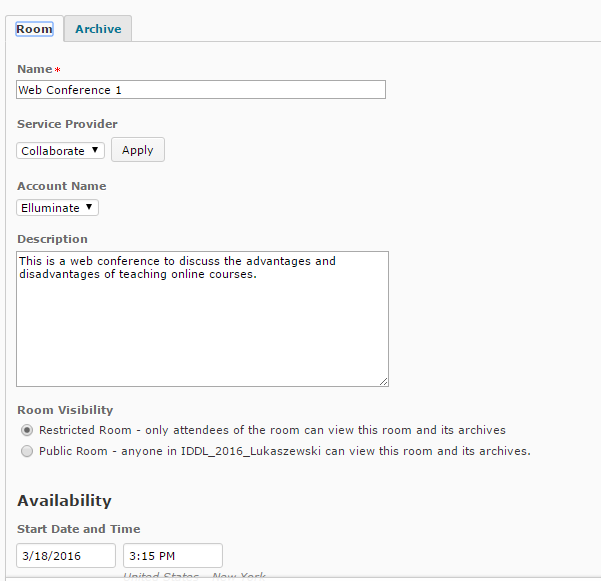
In D2L there is a feature, Collaborate, that allows for the creation of a synchronous web conference. In the communication area, you select Collaborate (Pilot Live in our current system) and click on new room. In the next screen, you enter a title for the room and a description if you would like. You can then decide if you want to restrict the room or have public view for accessing the room and its archives. You will then select the dates for the availability of the room. There are also several other options, such as having people enter the room with the hand raised, and the ability for moderators to see all private chats. Finally, you can save your changes and the room is created. You can archive your web conferences which is very helpful to those you can not participate in a synchronous manner. When I created my room, I received an error message but it did not tell me what the error was. I change the number removing the "#" from the name of the room and it saved fine but I tried other changes first. In summary, the overall findings of the creating a synchronous web conference:
- Strength: Very user friendly process
- Weakness: Error message are not informative or descriptive to fix.


Tool #5 Quality Check as a Demo Student
In D2L, there is a great option that every LMS needs to have. This is the ability to offer the demo student feature. If you click on the class list and scroll to the bottom of the list, you should see the demo student. When you click on the down arrow next to this name you will see the option to impersonate. This allows you to see the course pages as a student would see them. It also allows you to make sure links are working, documents are visible, and so forth. I did not find any drawbacks in this feature. In summary, the overall findings of the quality check as a demo student:
- Strength: You can make sure links are working, items are visible, and all other features before your course begins.
- Weakness: None.

Blackboard Evaluation
Tool #1 Creating a Electronic Gradebook
In order to set up a gradebook in Blackboard, you need to go into the Grade Center link under the Course Management Tools. You then select the Full Grade Center (this was not necessarily obvious but the only logical link) and Create Column. You then will fill out a Column Name and a Grade Center Name. You can select how you want the primary display to appear for the column. This can be a score, text, letter, percentage, or incomplete. You can also assign a category from a drop down list. The choices are survey, discussion, test, blog, assignment, journal, and self and peer. It should be noted that you can add new categories. You then can add the possible points. Rubrics, due dates, and other options can also be added here. Other options include whether or not student can see the class average.
In summary, the overall findings of the creating an Electronic Gradebook:
In summary, the overall findings of the creating an Electronic Gradebook:
- Strength: The creation of the column is straightforward.
- Weakness: The choices under the grade center are not intuitive to find the right link to do what you want.
Tool #2 Creating Groups
In Blackboard, you have the ability to create group by clicking the Users and Groups link in the Course Management Tools. You have the option to create a single group or a group set. The difference here is the single group is more like a stand-alone group. The group set would be if the groups were part of the Presentation Projects. So we will focus on a single group. The first decision is whether or not you want to assign member to groups or have them pick their groups. You need to make sure you make the group visible to the members. You can then add a description and decide which tools that group will have to use. These tools include: blogs, discussion, wikis, emails, file exchange, tasks, and academic materials. You can also add users here before you submit the group to be created. I found this process very easy and straight forward. In summary, the overall findings of the creating groups:
- Strength: The creation of the process is straightforward.
- Weakness: Need to understand the difference between a single group and a group set before creating groups.

Tool #3 Creating Group Discussion Topics
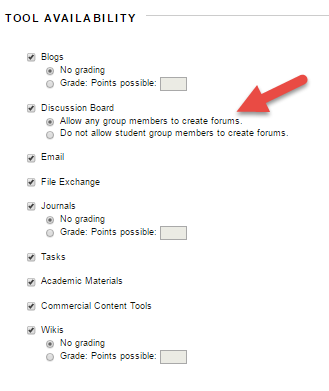
When you create the groups and select the tools for their use, one option is discussion board. You can determine whether or not members can create forums. I could not explore this options in greater details since I did not have member to create an actual team in the trial version of Blackboard. Therefore, I was unable to determine any weaknesses here. In summary, the overall findings of the creating group discussion topics:
- Strength: This functionality dies exist, can allow member to create forums
- Weakness: unable to determine if any exists due to the limitations of the trial version.
Tool #4 Creating a synchronous web conference
In Blackboard there is a feature, Collaborate, that allows for the creation of a synchronous web conference. However, I could not access this feature in the trial version of Blackboard. I will assume it is very similar to the process in D2L. You need to create a room with a title for the room and a description, which is optional. You can then decide if you want to restrict the room or have public view for accessing the room and its archives. You will then select the dates for the availability of the room. There are also several other options, such as having people enter the room with the hand raised, and the ability for moderators to see all private chats. Finally, you can save your changes and the room is created. You can archive your web conferences which is very helpful to those you can not participate in a synchronous manner. In summary, the overall findings of the creating a synchronous web conference (assuming it would be the same as the experienced using Collaborate through D2L):
- Strength: Very user friendly process
- Weakness: Unable to access this in the Blackboard trial.
Tool #5 Quality Check as Demo Student
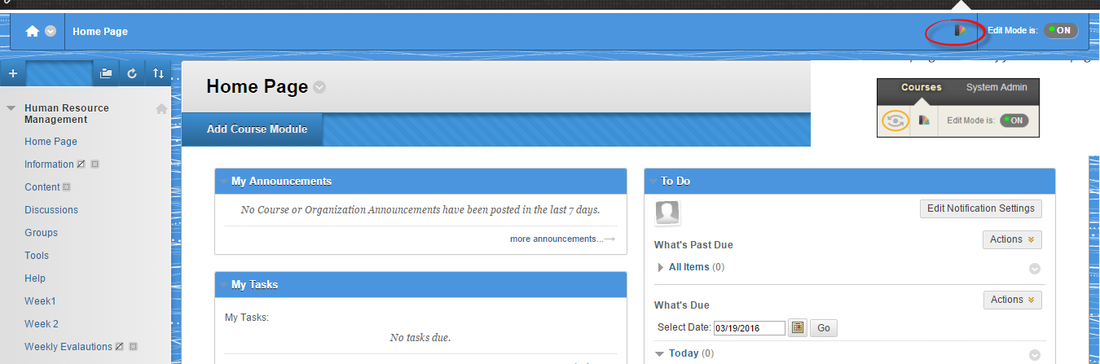
In Blackboard, you can enter into a course by using the student preview. This allows an instructor to enter into a course and see things from the student's perspective. You can test links, quizzes, assignments, and so forth. I was not able to access this in the trial version of Blackboard but I did find a quick video to show the screen in this mode (Student Preview, 2016). I think this feature is a great option and you have to remember to delete all data you created in the student preview. You can also interact with other students while in this mode but I think I would be cautious using this capability. I did not see immediate drawbacks with this feature. In the screen shot, you will note the the student preview icon is not an option in the trial version. If you look in the grey box underneath, I have add what the icon would be. So if you look at the red circle, the icon for the student preview would be on the left and would be the icon in the orange circle (see grey box). In summary, the overall findings of the creating a demo student:
- Strength: Instructor can check their course sites and their functionality
- Weakness: No weaknesses were detected.
LMS Weekly Recommendation
Based on the tools that were evaluated this week, I would say that most features were more straight forward in D2L. The navigation was more intuitive in D2L and the Demo Student was terrific! I also found that when searching for help outside of the two systems, I found more helpful tips and links about D2L. Therefore, this week's winner would be D2L.

References
Student Preview (2016). Student Preview. Retrieved from https://en-us.help.blackboard.com/Learn/9.1_2014_04/Instructor/130_Student_Performance/Student_Preview
