Week #3 - Assessment
LMS Evaluation Introduction

Welcome to the 3rd week of evaluations between the capabilities of Desire2Learn and Blackboard. This week five tools were examined within each system. These tools included:
- Create electronic gradebook categories & items
- Create dropbox assignments, turnitin.com, and grading rubric
- Create quiz questions in questions library
- Create electronic grades for quizzes, create quiz, modify quiz settings, and add randomizing question set to quiz
- Conduct quality check as a demo student
D2L LMS Evaluation
Tool #1 Change Gradebook Settings, Create Categories & Items - Change
In D2L, you can set up an electronic gradebook, as you will find discussed in Week 2 on this website, but also you can make changes to the gradebook as well. By clicking into the grades tab and then the settings tab, as displayed in the screen shot below, you can enter the Personal Display Options tab and determine how you want the grades displayed to your students. Please note: the changes made are only specific to the computer you are using and do not populate across other machines that you may use. This may be a slight drawback if you use more than one machine. The choices you have to select from under "grade details" are: points grades (displays point value associated with grade item), grades scheme symbols (displays grade scheme {A, B, C,...} associated with grade item), and grade scheme color (displays the color associated with grade scheme). You should note that the grade scheme color will only work if the grades scheme symbols option is selected as well. The next choice is to select your option under the Repeat Final Grades heading. You can select either: repeat calculated final grades at the start of the user list or repeat adjusted final grades at the start of the user list. This really just determines which columns are at the beginning of the gradebook columns. It should be mentioned that there is a small gray circle after each options alternative where you can click for help on this item. This is true of all the screens within the settings area. In summary, the overall findings of the changing Personal Display Options in the electronic gradebook:
- Strength: You have options about the appearance of your grade and help to explain each option.
- Weakness: Explanation provided in the help are vague. Examples would be helpful and recommendations for use would be beneficial.

Another option you have in the D2L gradebook is to set the Calculation Options. This option sets up how grades will be calculated during the course. The Grading System options let you select a weighted system, points system, or a formula. Once again you can click into each option for help if needed, but the options are pretty self-explanatory here. In the Final Grade Released section, you can select between calculated final grades or adjusted final grade. It is often recommended that you select the calculated final grades while the course is taking place. You may need to switch this option at the end of the semester to communicate with the Student Information System. In the next section, Grade Calculations, you can choose between drop ungraded item or treat ungraded item as a zero (0). If you do select the first choice, drop ungraded item, you do have to remember to award a zero in the gradebook for any assignments that were not turned in. If you fail to do this then the grade will be dropped and not totaled into the the final points amount. Lastly, you should click under Auto Update. in this same section of Grade Calculation, to Automatically keep final grades updated. Finally, we click save and we are done. This seems like a lengthy process but once you have gone through it it will take last than 1 minute to complete. In summary, the overall findings of the changing Calculation Options in the electronic gradebook:
- Strength: You have options in your grading system to select.
- Weakness: Initially the process seems to take a long time since you will probably need to read the help provide.

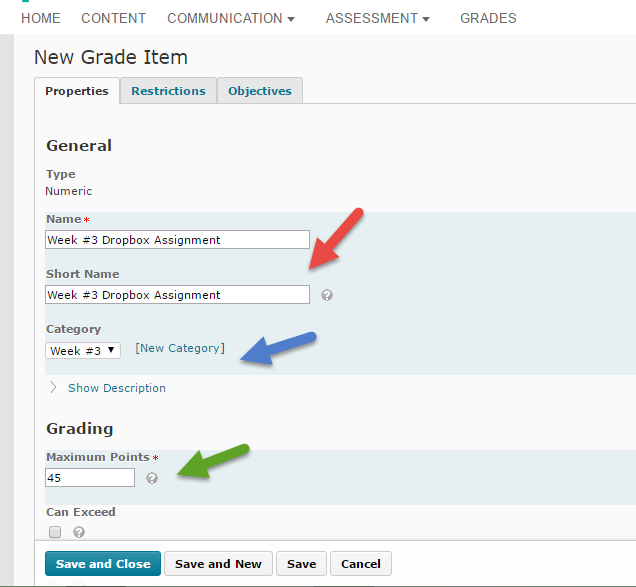
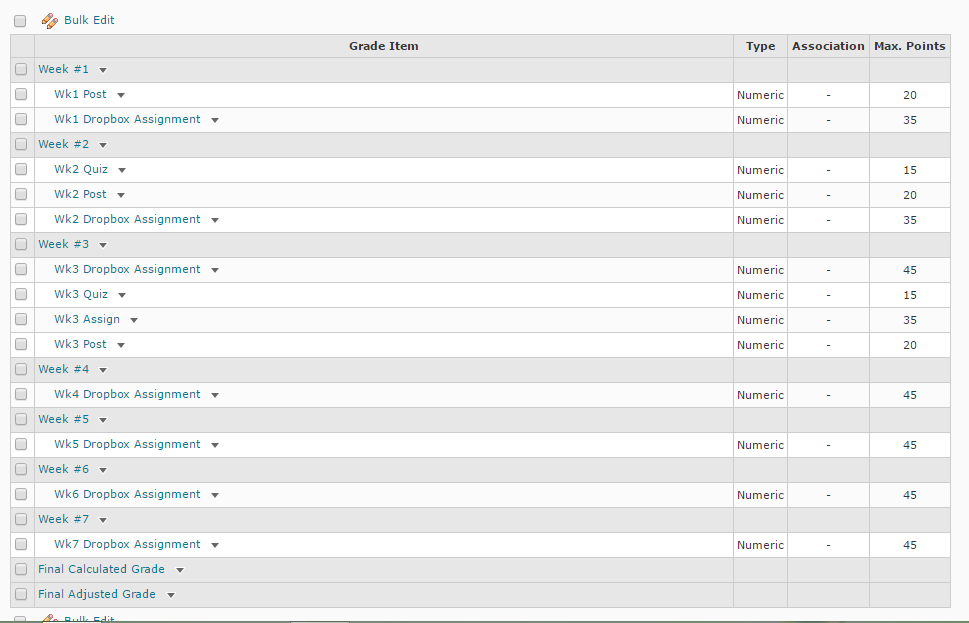
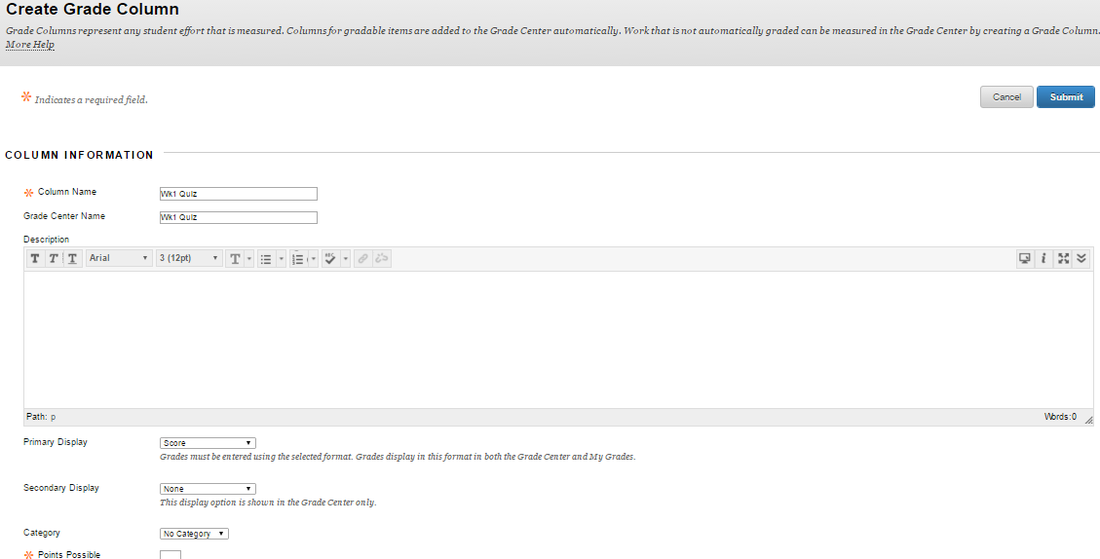
D2L allows the creation of gradebook categories that can help to organize related items into blocks or sections. You can arrange the category “Week #1” and organize the grades for that week. For example, as seen in the screen shot below you can include the Wk 1 Quiz, Wk 1 Post, and Wk 1 Dropbox Assignment in the category “Week 1”. You can use other options for categories, for example, grouping all quizzes together, all projects together, and so forth. The navigation was very easy once you understand the difference between an item and a category. You click on Manage Grades, select Category from the New button. You give the category a name (e.g., Week 1) and click save and close. To establish a new item, you click Manage Grades, select item from the New button. You must first select the type of grade item, it can be a numeric, pass/fail, text, or a formula. Next, you need to give a name to the new item (e.g., Wk1 Quiz) and select a category to associate with this item. This is an important step but simply attaching an item to a category can be overlooked - but you can edit it later if you miss this step initially. Once you have completed this you can assign the points to the item. You click save and close and the item is created. Below you will find the screen shots for creating a new item and what it looks like when both categories and items are completed. In summary, the overall findings of the setting up an category and/or an individual grade item electronic gradebook:
- Strength: You can set up categories and items to help organize the grades better
- Weakness: Easy to overlook associating the correct item with the correct category
Tool #2 Creating Dropbox Assignments, Turnitin.com, and Grading Rubric
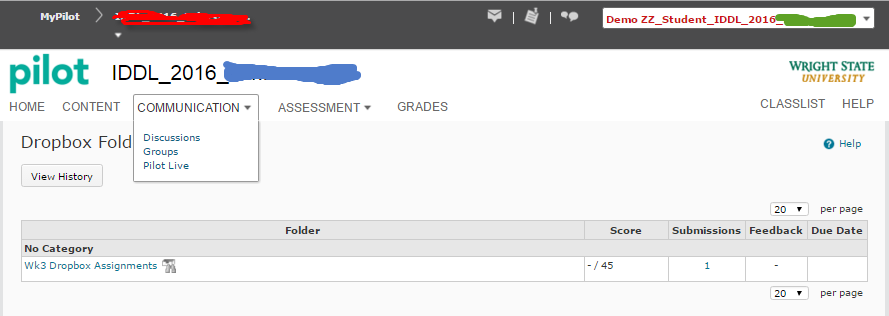
The ability to create a Dropbox in D2L is a great feature. The Dropbox features allows student to submit their papers, self-reflection, peer evaluations, and any other assignment into their area. To set up a Dropbox you need to click into the Assessment tab and click on Dropbox. You will then click on new folder and provide a name, such as Wk3 Dropbox Assignments. You will then want to make sure the box is checked on for the Originality Check. This is actually an incredible feature from the third-party vendor, Turnitin.com. This tool aids in detecting plagiarism issues. A report is actually generated for the instructor that clearly depicts the results. Next, you will next to select the appropriate grade item to associate with the Dropbox. If you have not created the grade item you can click on the link provided here to do this. You will then need to complete the points allowed for the assignment in the “Out of” text box. Option for submissions are provided for you to determine. You can allow one submission per user or unlimited submission. If you decide to allow unlimited submissions, you can decide rather you want to keep all versions submitted or if you only want to keep the most recent. The last feature to make sure that is checked on is the ability for the students to see their originality reports. This is located under the Show Advanced Originality Checking Options link. The ability for the students to see their report would allow for any potential issues or problems to be addressed before the deadline dates. In summary, the overall findings of the creating a Dropbox folder:
- Strength: The process is very simple. The Originality Check feature is awesome!
- Weakness: I did not find any weaknesses in this feature
Another great feature in D2L, is the ability to create a rubric. You go into the Assessment tab and click Rubric, You then have to fist give your rubric a name, i.e. , Writing Assessment Rubric. You can pick a status type but I suggest leaving it as a draft until you have completed the rubric. You will need to make it published when you complete and save it or you will not be able to see it as a viable choice for use. You will then design the type of rubric: holistic (a general one score rubric) or analytic (scores given across different criteria). My recommendation would be analytic. You will fill in the number of levels and criteria. The last decision to make is your scoring method. The options are test, points, or custom points. You should save your rubric. Next you need to fill in the levels and criteria you have determines by clicking on each and selecting edit criterion. You can then fill in the descriptors by typing them in or by cut and pasting. There is a video below to guide you through this process. Once you rubric is completed, published, and saved you can go back into the Dropbox created and add the newly created rubric to the Dropbox. In summary, the overall findings of the creating a Rubric:
- Strength: The process is very simple to follow to create.
- Weakness: The initial development process can be very time consuming.
Tool #3 Creating Quiz Questions in Question Library
You preparing a quiz in D2L you are able to create a Question Library. This is a repository where you can create many different types of questions to use on future quizzes or exams. You are able to copy these libraries from one course to another for future semesters. To create the Question Library, you go into the Assessment tab and click on quizzes and select Question Library. You can then click on new and a drop down menu of various types of questions appear. You can choose from numerous types such as: multiple choice, matching, short answer questions, long answer questions, and true –false.

Once you have selected the desired type of question, the process is pretty straight forward. For example, if you choose multiple choice then you can give the question a title if you want. This may be helpful if you are trying to locate a specific question in case there is a typo or problems with it. You then can assign the point value of the question and the difficulty level. Next, you need to enter the question into the text box. There are options to even enter images if needed. You then enter the answer for each question alternative. You can always add feedback per alternative if you would like. You need to assign the weight to the right answer or answers. Finally, you need to save this option. Another nice feature here is that you can preview the question to see how it will appear in the quiz. There are screen shots provided below. In summary, the overall findings of the creating a question library:
- Strength: Great feature overall. There are numerous types of questions to choose from.
- Weakness: Sometimes creating a specific type of question is not intuitive, for example, the short answer questions.


Tool #4 Creating Electronic Grades For Quizzes - Create Quiz, Modify Quiz Settings, and Add Randomizing Questions Set to Quiz
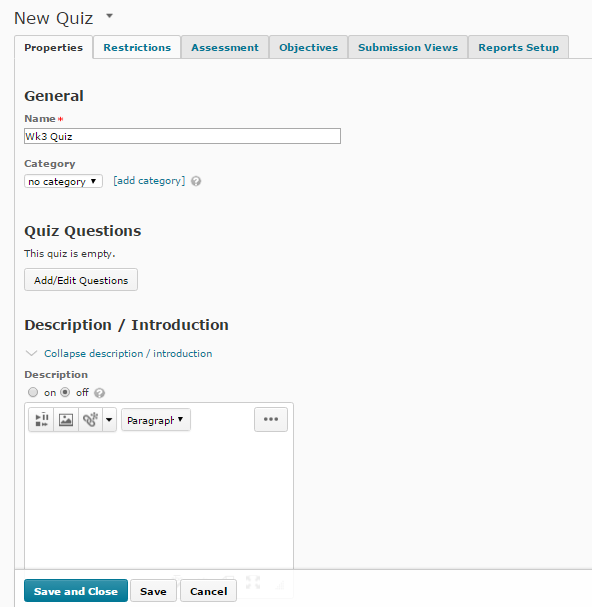
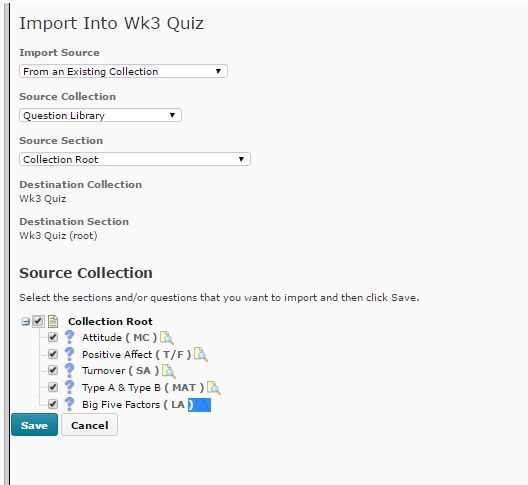
Once you have developed your question library to pull from you could then create your quiz. You can go into the Assessment tab and click on quiz. Under the Manage Quizzes section select new quiz and begin the process. You need to give the quiz a name, for example, Wk3 Quiz. You then need to click on the Add/Edit Question buttons to add the questions from your question library. You then click on import and select the source collection (question library) and source root (collection root). Your questions from the library should appear and you select which one you want. Finally you click save. On the next screen you should click on done editing questions and you will find yourself in the Edit Quiz page where you can select various options for your quiz. These will be discussed in the next section.
Once you create you quiz, there are several options you can utilize. On the Properties tab, you can determine how many questions per page and whether the students can move backwards through the pages. This tab should also show you the individual items added to the quiz, the types of questions, and point values. Finally you need to save.

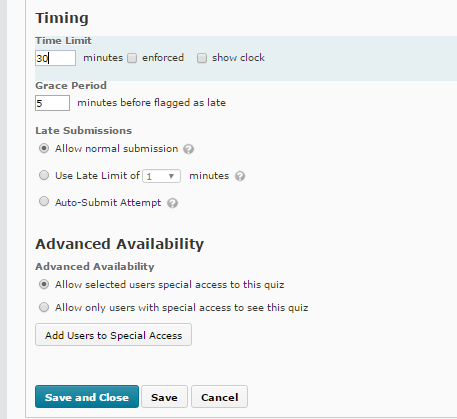
On the Restrictions tab, the main thing to do here is to make sure your quiz is active. You can also add start and end dates. You can use additional release conditions, which will be discussed in a future week. You have security options here as well. You can set a time limit and grace period. You can select if you are allowing late submissions. Lastly, you can give special access to students that may need extra time or miss the original time due to an illness. Finally, you will need to save your changes. In summary, the overall findings of the creating a quiz:
- Strength: You can select questions from the question library. Numerous options regarding security, submissions, and so forth
- Weakness: Bringing in the questions from the library and using the options can be confusing initially.

Tool #5 Quality Check as a Demo Student - Dropoff Assignment & Instructor Grade Assignments
In D2L, there is a great option that every LMS needs to have. This is the ability to offer the demo student feature. If you click on the class list and scroll to the bottom of the list, you should see the demo student. When you click on the down arrow next to this name you will see the option to impersonate. This allows you to see the course pages as a student would see them. It also allows you to check the Dropbox assignment and Instructor Quiz. I did not find any drawbacks in this feature. In summary, the overall findings of the quality check as a demo student:
- Strength: You can make sure links are working, items are visible, and all other features before your course begins.
- Weakness: None.
Blackboard Evaluation
Tool #1 Creating an Electronic Gradebook Categories & Items - Change Gradebook Settings
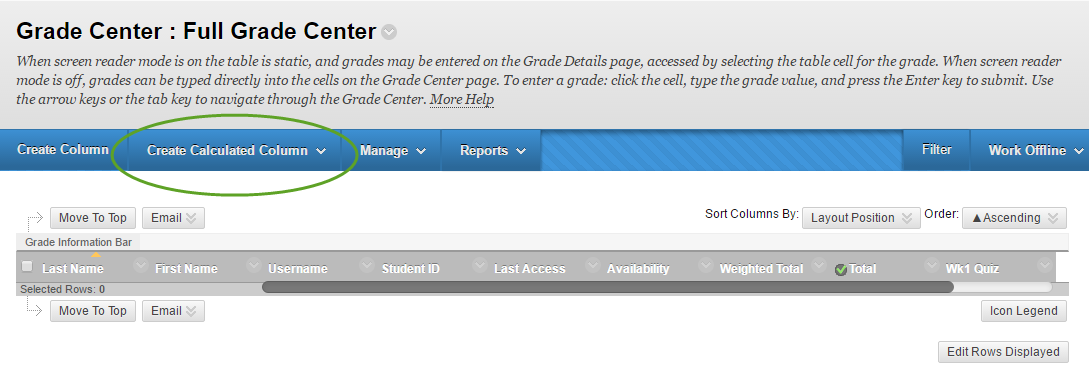
In Blackboard, when you access the Full Grade Center you can Create Calculated Column based on several options.
- If you select the Average Column this allows to calculate and display the average for the columns that are selected. This can only be done on columns with numbers in them (same is true of other alternatives).
- The second option is the Minimum/Maximum Colum which calculate either grade respectively.
- The Total Column calculates the total points for a number of selected columns related to the total number of points assigned. This is essential for helping with final grades.
- The last alternative is the Weighted Column which calculate and displays a grade based on the selected columns based on their respective worth to the total grade. Based on your chosen option, the process to create the column is very straight forward.
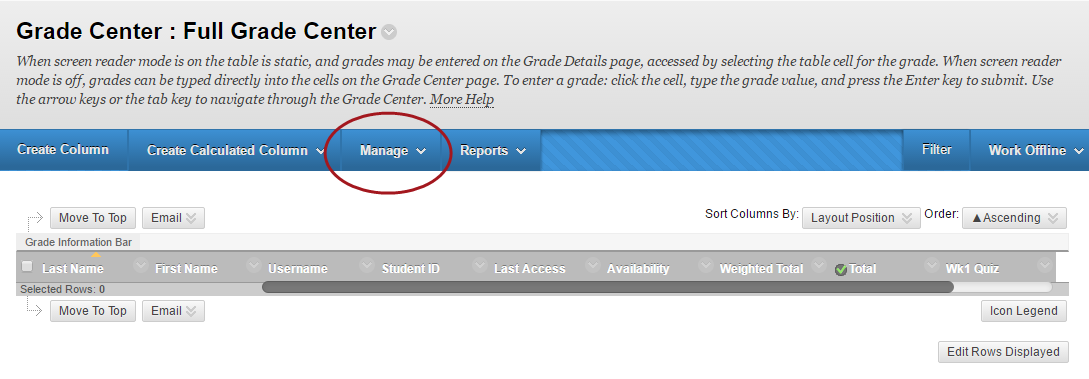
Under the Manage tab, there are numerous options here.
- If you select, Grading Periods can be used to sort Grade Center Columns into sections based on due date. Reports can be generated based on grading periods.
- The option is Grading Schemas which take the actual points scored from a graded item and compare it to total points availability and present a percentage.
- The option is Grading Color Codes which apply background and text color to items in the Grade Center that meet specified criteria (e.g., score, grade status).
- Another option is the Grade Center Category which is used to organize and view Grade Center data and can be used when creating Calculated Columns to perform operations on all Grade Columns in a Category. Examples of Categories include: Assignment, Blog, Discussion, Journal, SafeAssignment, Self and Peer, Survey, and Test (these cannot be removed or edited).
- The option of Smart Views are focused views of the Grade Center.
- The Column Organization page is divided into various tables that control how different Grade Center views are displayed. Rows in these tables represent Columns in the Grade Center views. Rows can be manipulated to customize the different views of the Grade Center
- Row Visibility is an option where rows can be hidden from the Grade Center View to reduce the number of rows in the grid. Hidden Rows are not removed from the Grade Center, and can be shown at any time.
- Send email
- Connection to Third party - for example, the direct links to Wiley Plus or McGraw Hill Connect are listed.
Under the Reports tab, you have two options here. You can Create Reports which allow you to create customized reports from the data found in the Grade Center. These reports can be printed. If you select the Grade History option than you are able to track all changes that occur within the Grade Center.

In summary, the overall findings of the Full Grade Center options :
- Strength: Definition are provided under each title to see what each feature does. The creation of the process is straightforward.
- Weakness: I did not see any weaknesses in these options.
In summary, the overall findings of the creating an individual item:
- Strength: The creation of the individual item is straightforward.
- Weakness: The choices under the grade center are not intuitive to find the right link to do what you want.
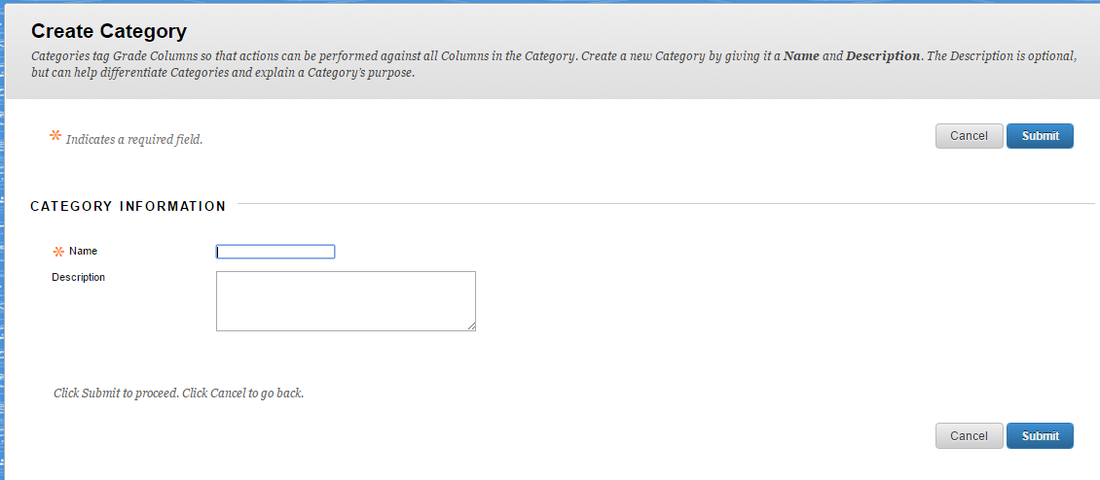
In order to set up a category in Blackboard, you need to go into the the Full Grade Center and Manage. You then select a Categories and Create Category. You then give it a name and a description if needed. You will then save.
In summary, the overall findings of the creating categories :
In summary, the overall findings of the creating categories :
- Strength: The creation is straightforward.
- Weakness: I did not find any.
Tool #2 Creating SafeAssign Assignments and Grading Rubric
In Blackboard, you have the ability to create assessments and a dropbox using SafeAssign. This is a tool to help detect plagiarism issues. You will need to click into Content and select SafeAssign. You will then give the assignment a name, possible points, and a due date. Instructions may also be added. The default for making the assessment visible and the student being viewable are two defaults that are on but you do have other options to consider. These include: availability date, track number of views, and if this is a draft. You will then save. Now if you go into the course management tool and click on Course Tool and SafeAssign you would be able to see the submissions that can in. I did not see a place to link a rubric here from the screens. The is a video below to help you with this process. In summary, I found creating assignments and dropboxes through SafeAssign:
- Strengths: Very straight forward process.
- Weaknesses: I did not locate a link to attach a rubric.
You are able to create a rubric in Blackboard. You will click on the Course Management Tools and select Rubric in the Course Tools Area. It is very straight forward here. You give it a name, a description, and there is a mock up rubric with categories and levels to stay from. You can change titles, percentages provided, and weights of criteria. The addition of the descriptors of each level can be cut or pasted or types in directly. Finally, you save the rubric and you see its name on the screen as completed. You can make edits when it is finished as well. As far as linking this rubric to an assignment, I found no help within the trial version of Blackboard to demonstrate how to do this. Tutorial were found online from external sources that demonstrated this but the fields and links were not the same on my screens. I would like to think this is found in the trial version only and would not be a problem in the full version. In summary, the feature of creating and adding a rubric:
- Strengths: The creation was very easy and straightforward.
- Weaknesses: The link to add the rubric to the assignment was not present in the trial version and the internal help did not address this.
Tool #3 Creating Test Questions in the Pool (Question Library)
You preparing a test in Blackboard you are able to create a Pool. This is a repository where you can create many different types of questions to use on future quizzes or exams. To create the Pool, you go into the Course Management Tools and select Tests, Surveys, and Pools. From here you can click on Pools. You have the options to import items or create them here. We will create them here. You create the Pool first giving it a name, descriptions, and/or instructions and save. You now can create your items. You can then click on Create Question and a drop down menu of various types of questions appear. You can choose from numerous types such as: multiple choice, matching, short answer questions, long answer questions, and true –false. . A screen shot is provided below.

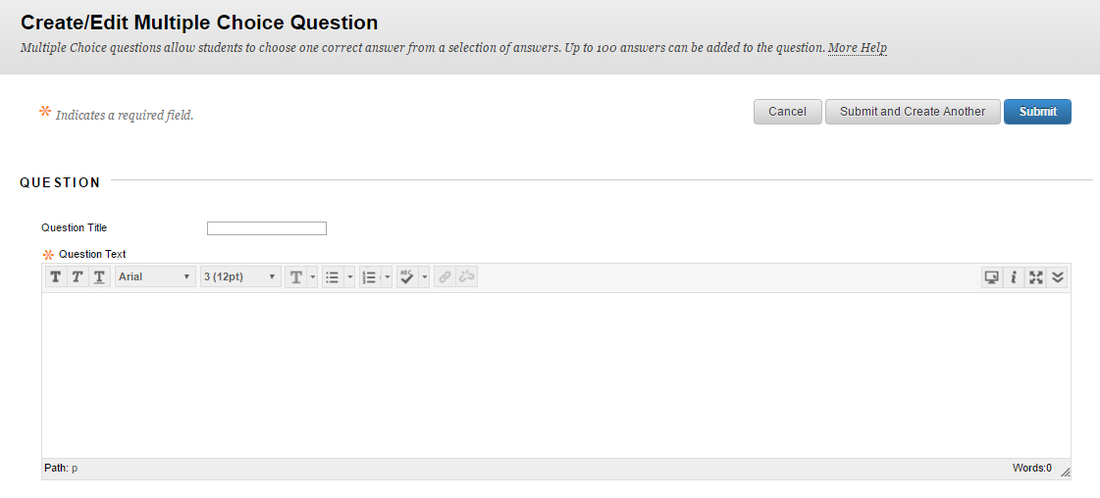
Once you have selected the desired type of question, the process is pretty straight forward. For example, if you choose multiple choice then you can give the question a title if you want. This may be helpful if you are trying to locate a specific question in case there is a typo or problems with it. Next, you need to enter the question into the text box. You then enter the answer for each question alternative and use the radio button to show which is correct. You can always add feedback per alternative if you would like. You need to save this option. The other items are pretty straight forward. Below are screen shots when completing a multiple choice and when the Pool is finished. You can add the points value to each item on this completed screen but the boxes are very small and each value had to be saved individually. I do not see an opportunity to preview each question when completed. In summary, the feature of building a pool:
- Strengths: The creation was very easy and straightforward. Loads of types of questions to choose from.
- Weaknesses: I could not preview the finished item. The box to enter points value were tiny and had to be saved each time,

Tool #4 Tool #4 Creating Electronic Grades For Tests - Create Test, Modify Test Settings, and Add Randomizing Questions Set to Test
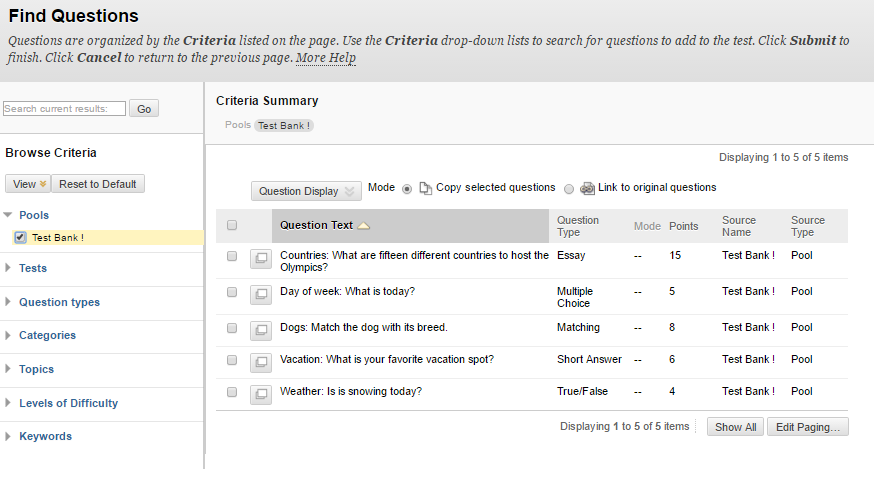
Once you have developed your pool to pull from you could then create your test. You can go into the Tests, Surveys, and Pools link and click on Tests. You could either import a test or create a new one. You need to give the test a name, for example, Test 1 and submit. On the next screen you can create questions, reuse questions, or upload questions. We will reuse question (the test bank we just created in the previous tool) and select find questions. You can open the pool created (i.e., Test Bank 1) and proceed from there. Once you open the pool, you can select the desired questions and complete the test. You will get a view of the test when it is finished.
In summary, the features of creating a test,
In summary, the features of creating a test,
- Strength: Very user friendly process
- Weakness: I did not see much editing capabilities in the completed tests.


Tool #5 Quality Check as a Demo Student - Dropoff Assignment & Instructor Grade Assignments
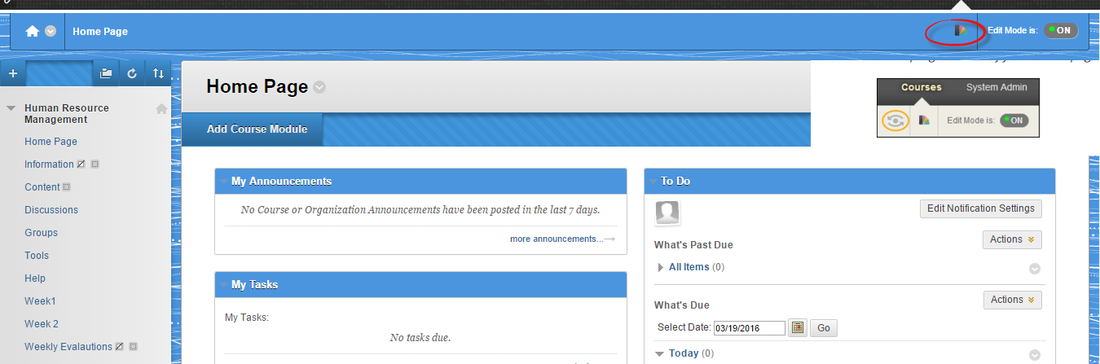
In Blackboard, you can enter into a course by using the student preview. This allows an instructor to enter into a course and see things from the student's perspective. You can test links, quizzes, assignments, and so forth. I was not able to access this in the trial version of Blackboard but I did find a quick video to show the screen in this mode (Student Preview, 2016). I think this feature is a great option and you have to remember to delete all data you created in the student preview. You can also interact with other students while in this mode but I think I would be cautious using this capability. I did not see immediate drawbacks with this feature. In the screen shot, you will note the the student preview icon is not an option in the trial version. If you look in the grey box underneath, I have add what the icon would be. So if you look at the red circle, the icon for the student preview would be on the left and would be the icon in the orange circle (see grey box). In summary, the overall findings of the creating a demo student:
- Strength: Instructor can check their course sites and their functionality
- Weakness: No weaknesses were detected.
LMS Weekly Recommendation
Based on the tools that were evaluated this week, I would say that most features were more straight forward in D2L. The navigation was more intuitive in D2L and the Demo Student was terrific! I also found that when searching for help outside of the two systems, I found more helpful tips and links about D2L. Therefore, this week's winner would be D2L.

References
Student Preview (2016). Student Preview. Retrieved from https://en-us.help.blackboard.com/Learn/9.1_2014_04/Instructor/130_Student_Performance/Student_Preview
